

kyi scope from launch to a verified asset, then the asset-list and wallet-list scopes.
All screenshots are from the production widget, with numbered callouts. Steps 1–3 come from the drawer opened on a test partner page. Steps 4–10 come from Bluprynt Passport: the drawer renders the same asset and wallet-signing components once KYB is done, and a fresh test organization can’t reach them without filing a real KYB. Personal details are greyed out.
Step 1: Open the drawer
Your page callskyi('drawer', 'kyi', accessToken). The drawer slides in from the right and shows where the member’s organization stands.
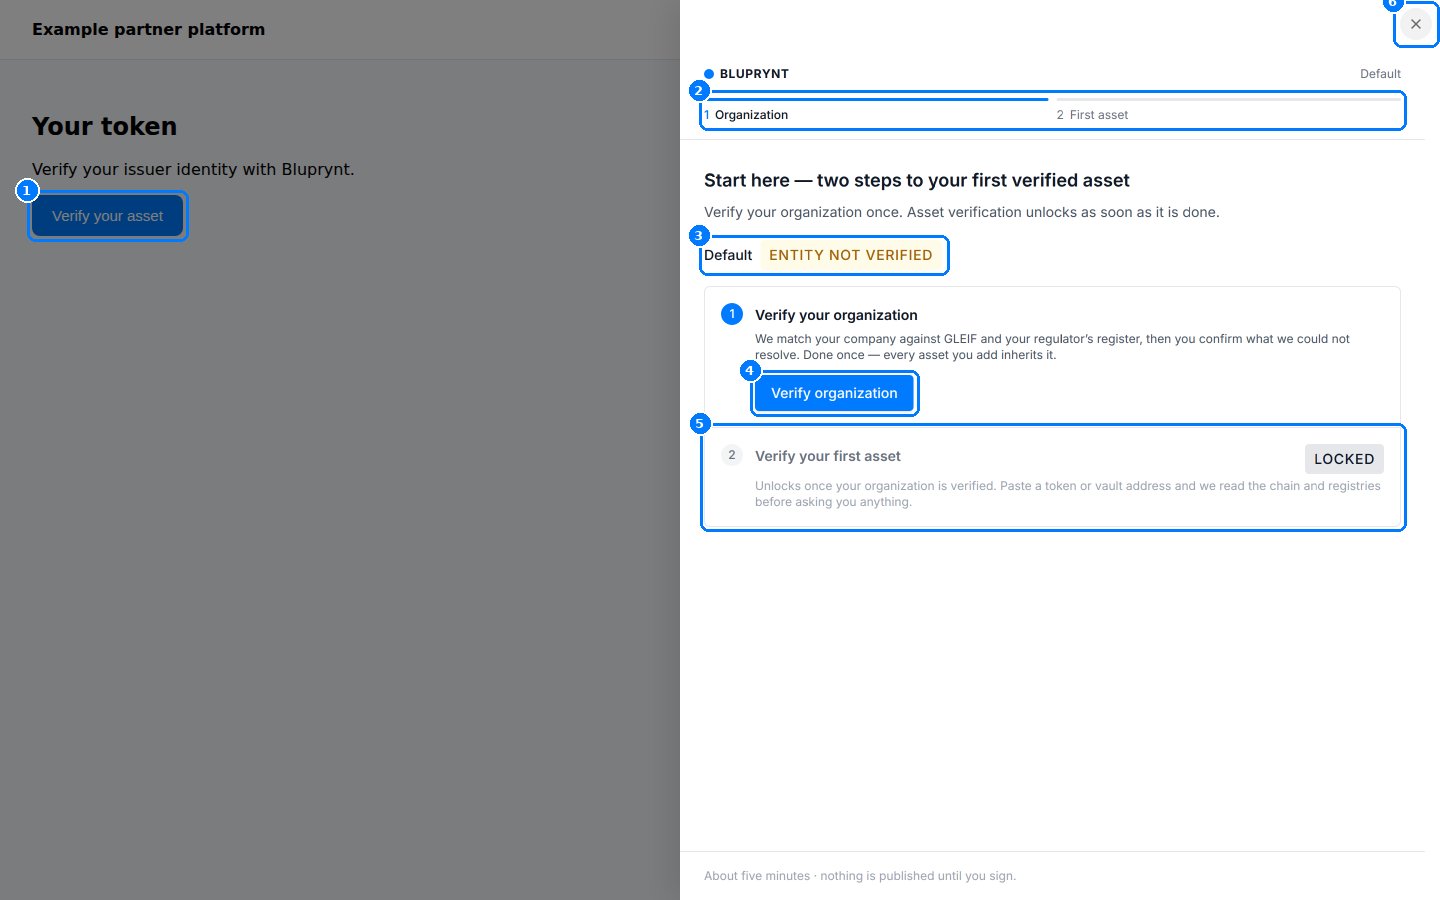
The kyi scope for a new organization.
- Your button. Any element on your page can open the widget.
- Progress. Two stages: Organization, then First asset. A finished stage turns green.
- Organization status.
Entity not verifieduntil KYB is approved. - Verify organization starts KYB.
- Verify your first asset stays Locked until the organization is verified.
- Close. The round close button, a backdrop click or
Escapecloses the drawer and firesonClose.
Step 2: Verify the organization (KYB)
KYB runs once per organization. Every asset added afterwards inherits it. Bluprynt matches the company against GLEIF and the regulator’s register, then asks the member for anything it couldn’t resolve. The forms are provided by Sumsub.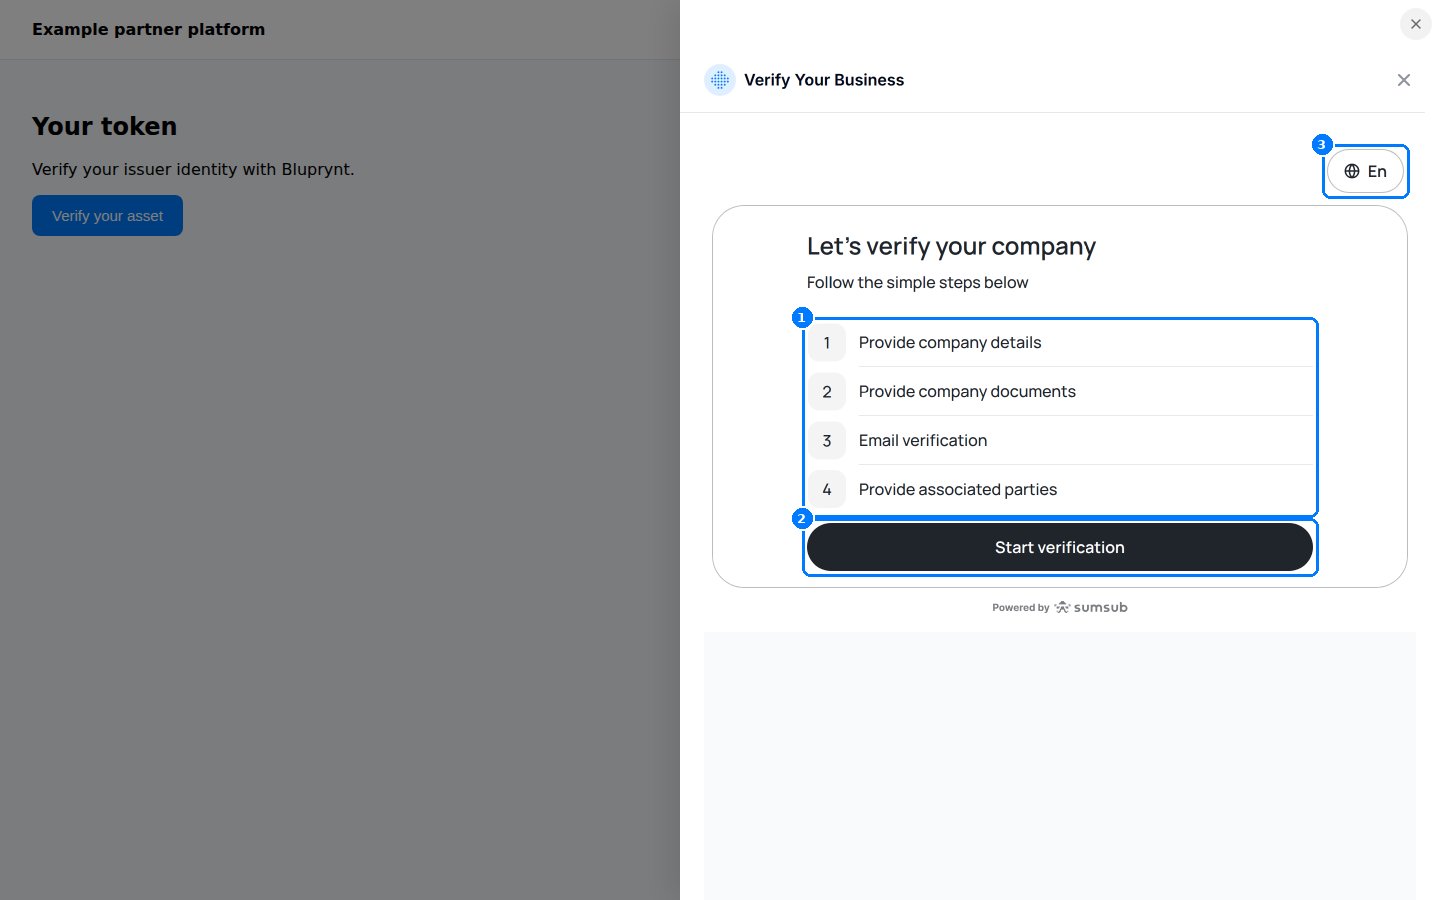
KYB opens inside the drawer.
- The four KYB steps: company details, company documents, email verification, and associated parties (directors, shareholders and beneficial owners).
- Start verification opens the first form.
- Language. The member can switch the form’s language.
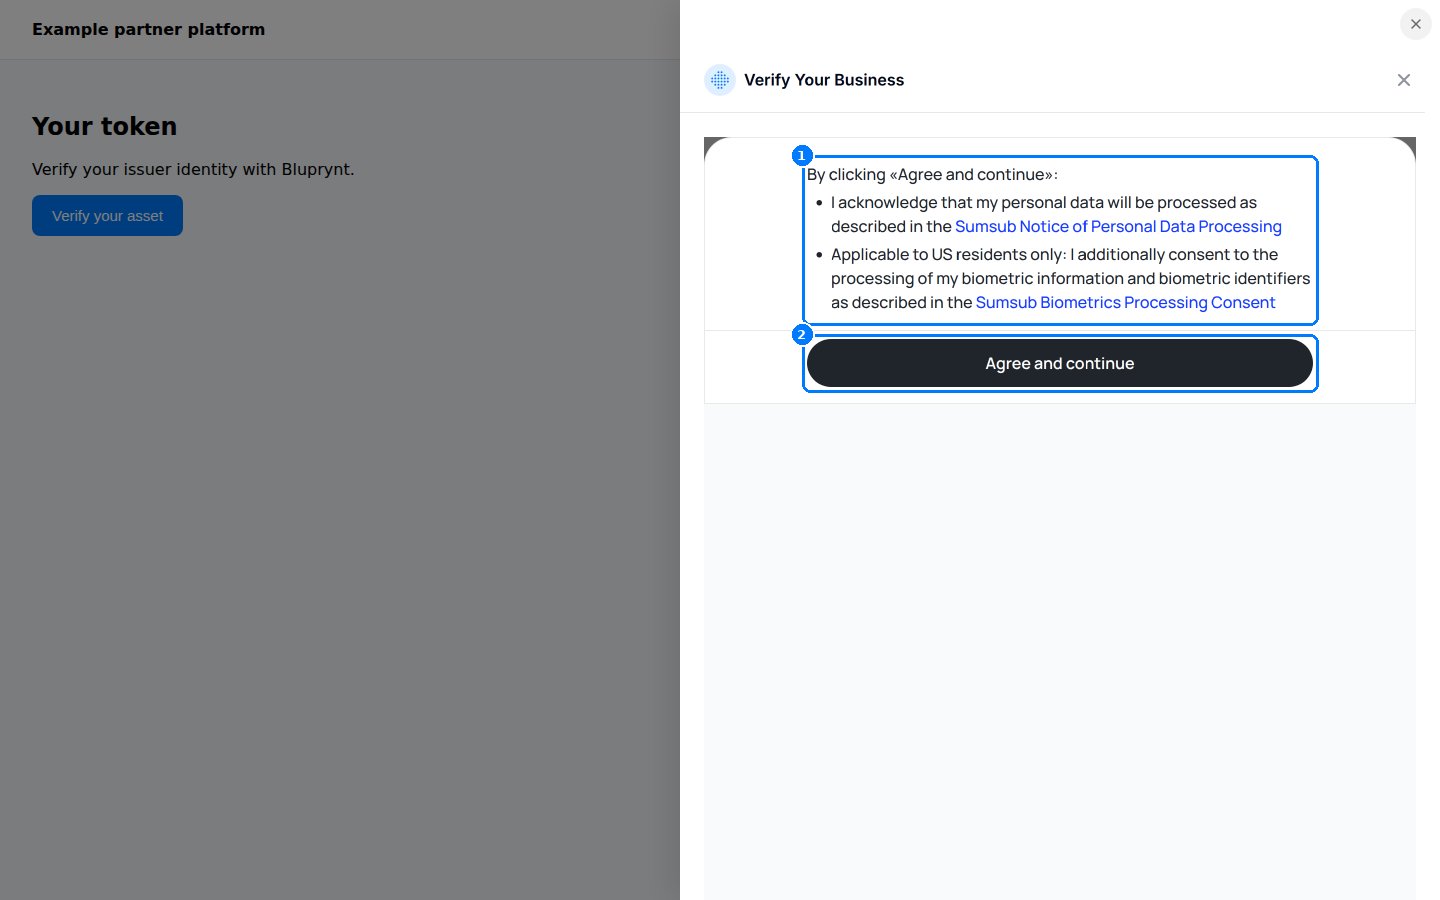
Before the forms, the member agrees to Sumsub's data-processing notice.
- Data-processing notice. US residents also agree to biometric processing.
- Agree and continue opens the company-details form.
Sumsub decides which documents it asks for based on country and company type. The forms are filled out by the member, not by your integration.
sub, it picks up where they left off.
Step 3: Add an asset
After KYB, the drawer shows an address field. The member pastes a token or vault address. Bluprynt detects the chain from the address format and checks whether the asset is already on file.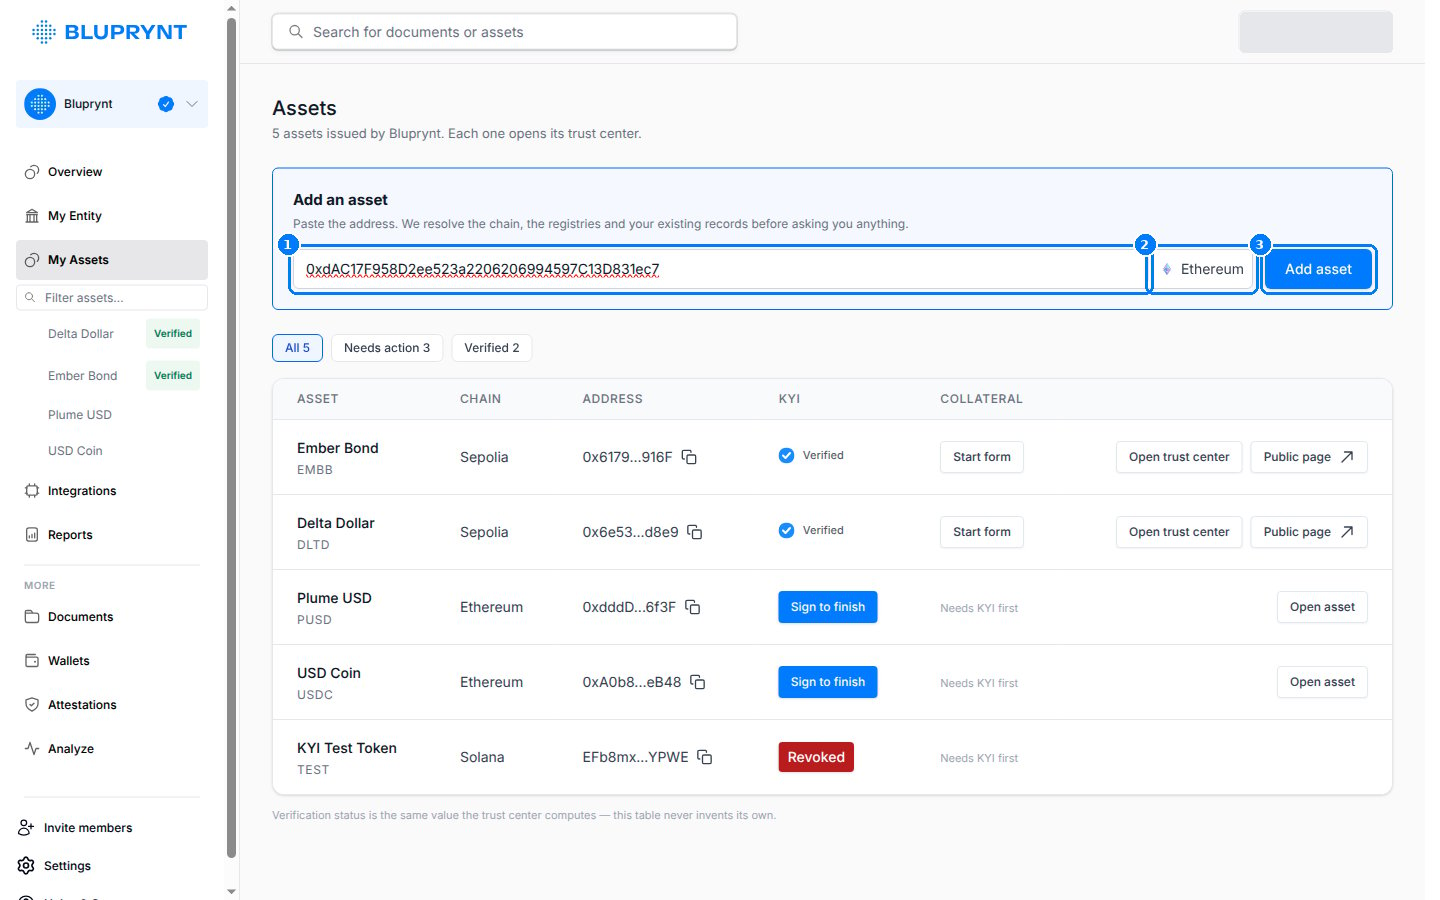
Shown in Passport. The drawer uses the same field.
- Address field. Accepts EVM
0x…addresses, Solana mint addresses and XRPL issuers. See Supported chains. - Detected network. If an address is valid on several EVM networks, this becomes a menu so the member can pick one.
- Add asset (Verify in the drawer) reads the chain. Nothing is read or created before the member presses it.
Step 4: Confirm the asset details
Bluprynt prefills what it can from the chain and from what’s already on file for the organization. The member fills in the rest.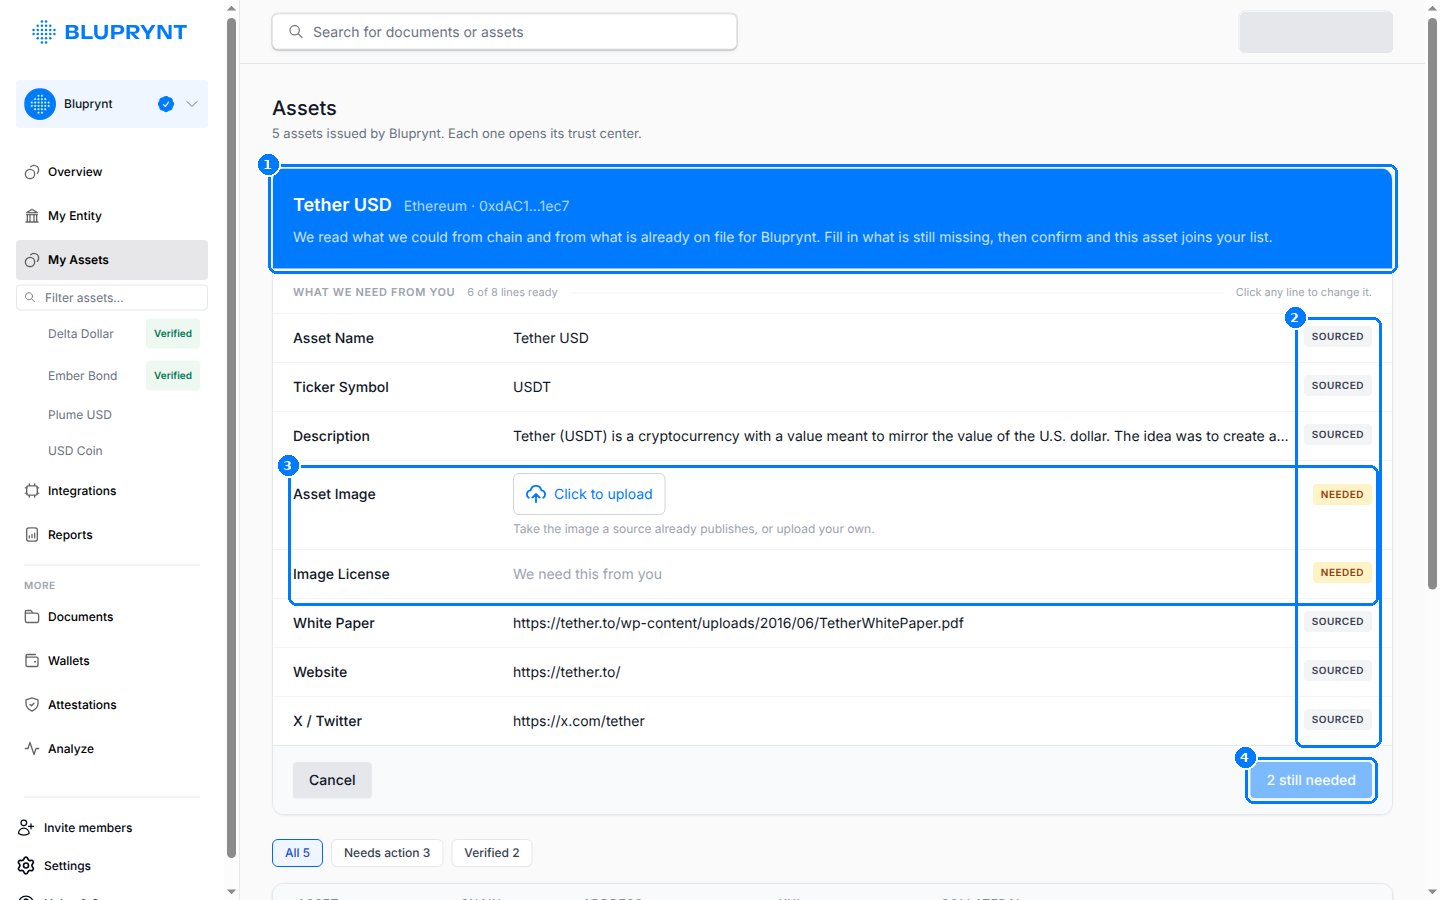
Details read for USDT on Ethereum. Shown in Passport.
- The asset, its chain and its shortened address.
- SOURCED marks values Bluprynt found. Click any row to change it.
- NEEDED marks values the member must provide, such as the asset image and image license.
- The confirm button counts what’s missing (“2 still needed”) and turns into Confirm when every line is ready.
Confirming creates the asset and its KYI application. Then Bluprynt reads the chain for the wallets that control the token.
Step 5: Sign for each authority wallet
Bluprynt lists every wallet with on-chain authority over the token: owner, admin, minter, upgrade admin, or mint and freeze authority on Solana. Each wallet signs once, and one signature covers every token that wallet controls.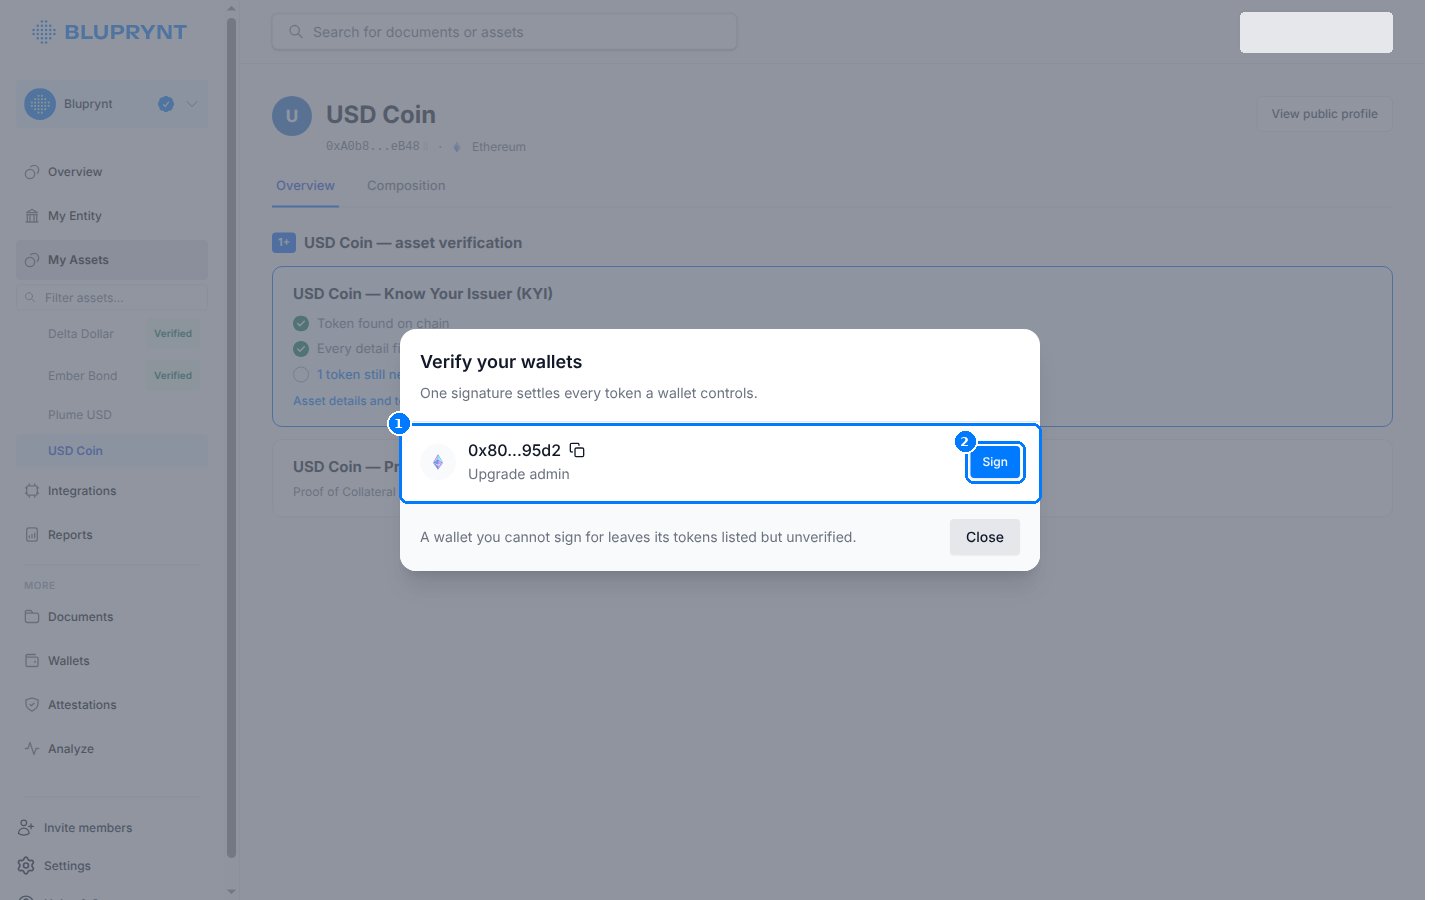
The wallet queue for USD Coin. Shown in Passport.
- Authority wallet and its on-chain role, here
Upgrade admin. - Sign opens the signing methods.
Choose a signing method
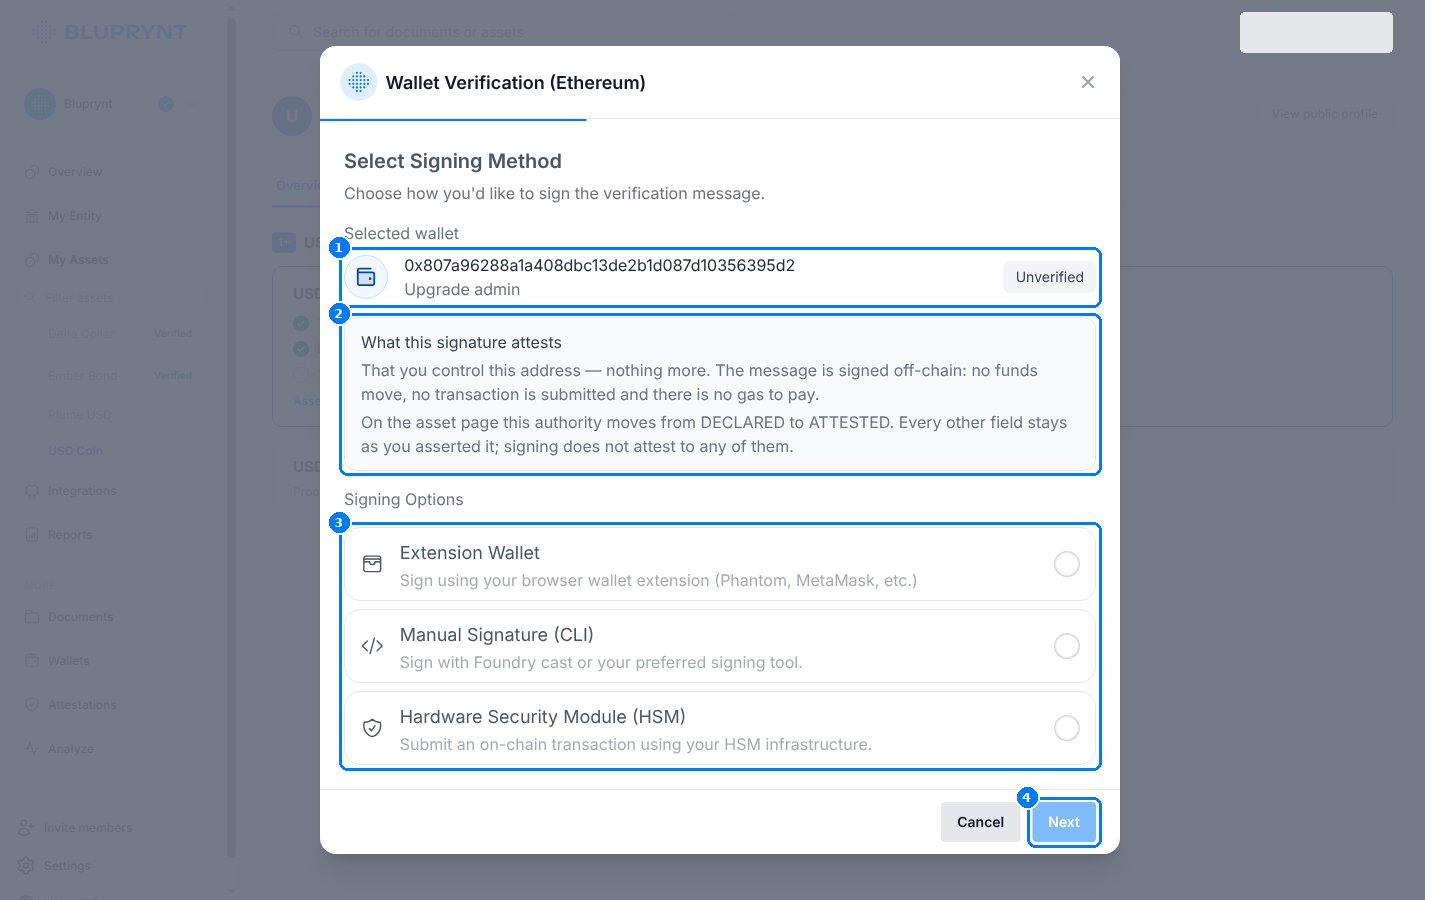
Signing methods for an Ethereum wallet.
- Selected wallet, with its role and status (
Unverified). - What this signature attests: only that the member controls the address. The message is signed off-chain, so no funds move and no gas is paid. On the asset page, the authority moves from
DECLAREDtoATTESTED. - Signing options. See the tabs below. Some integrations also offer Transaction Verification, where you send a micro-ETH amount to Bluprynt’s verification address. Ask your Bluprynt contact whether it’s enabled for you.
- Next opens the chosen method.
- Extension wallet
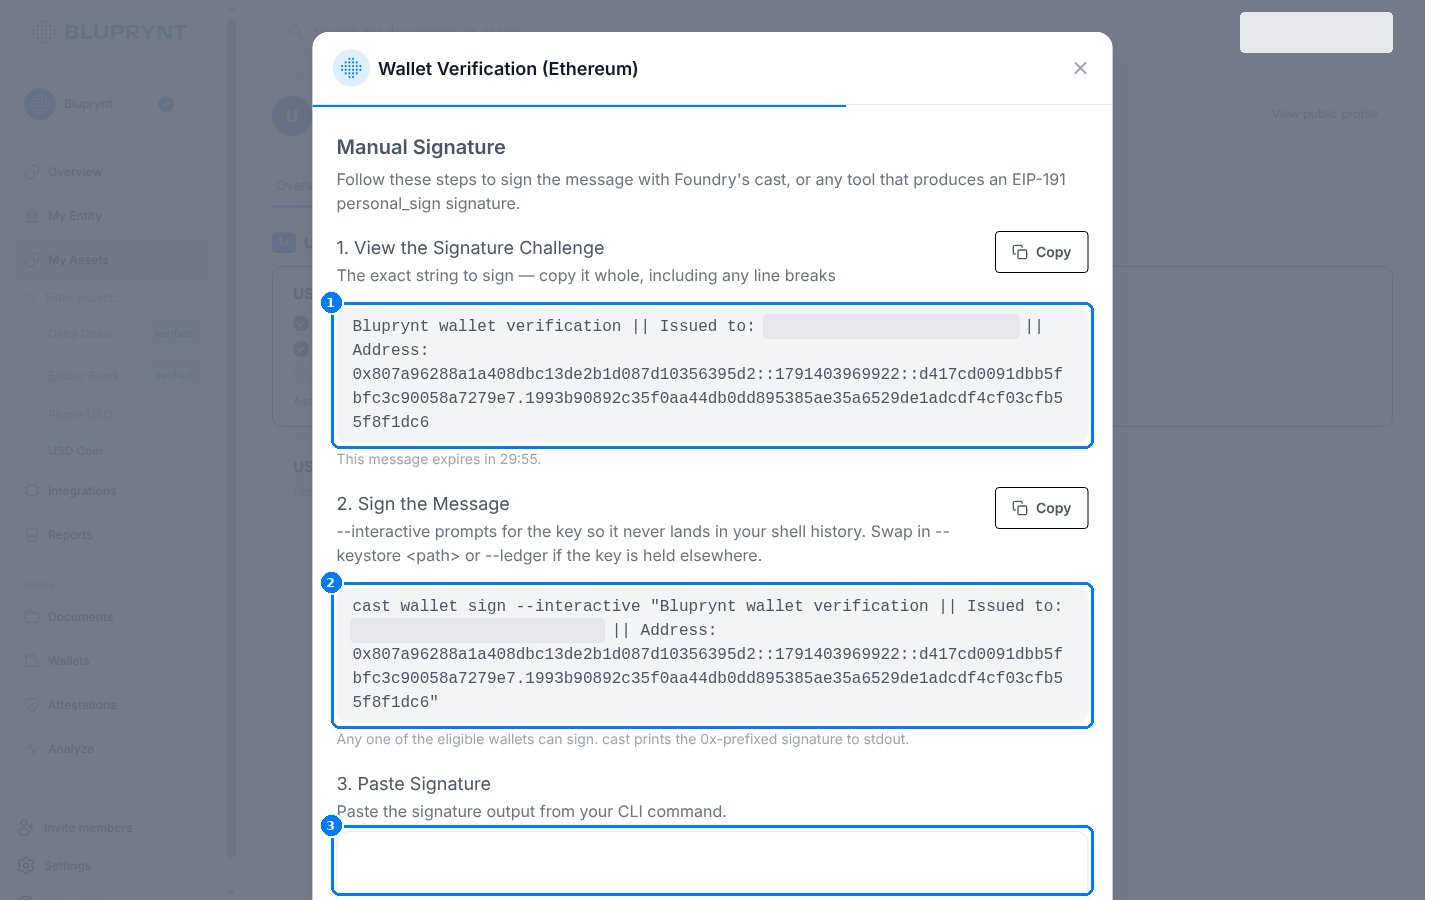
- Manual signature (CLI)
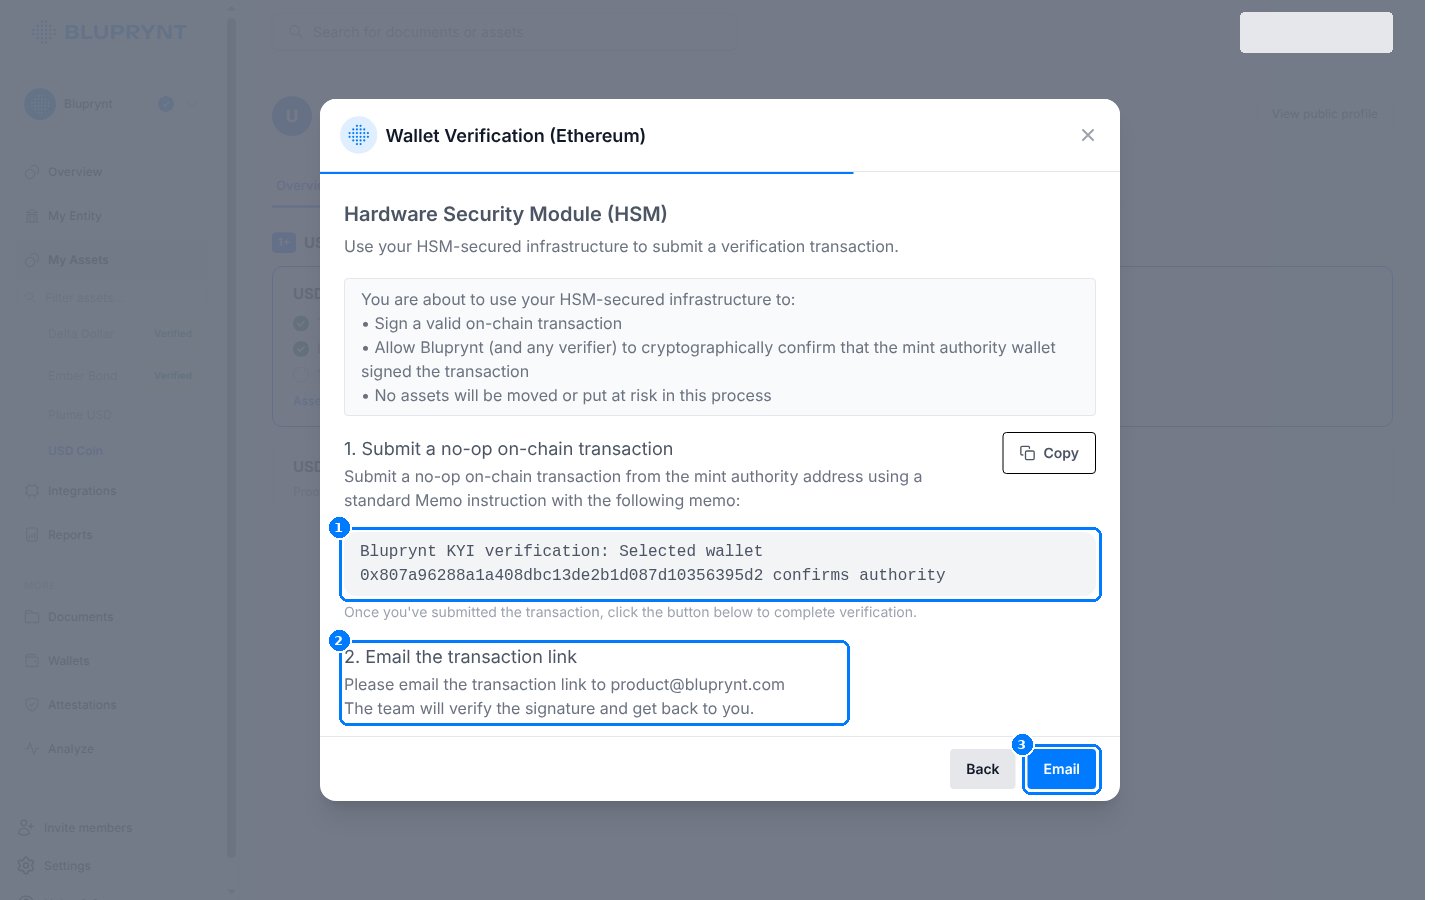
- HSM / custody
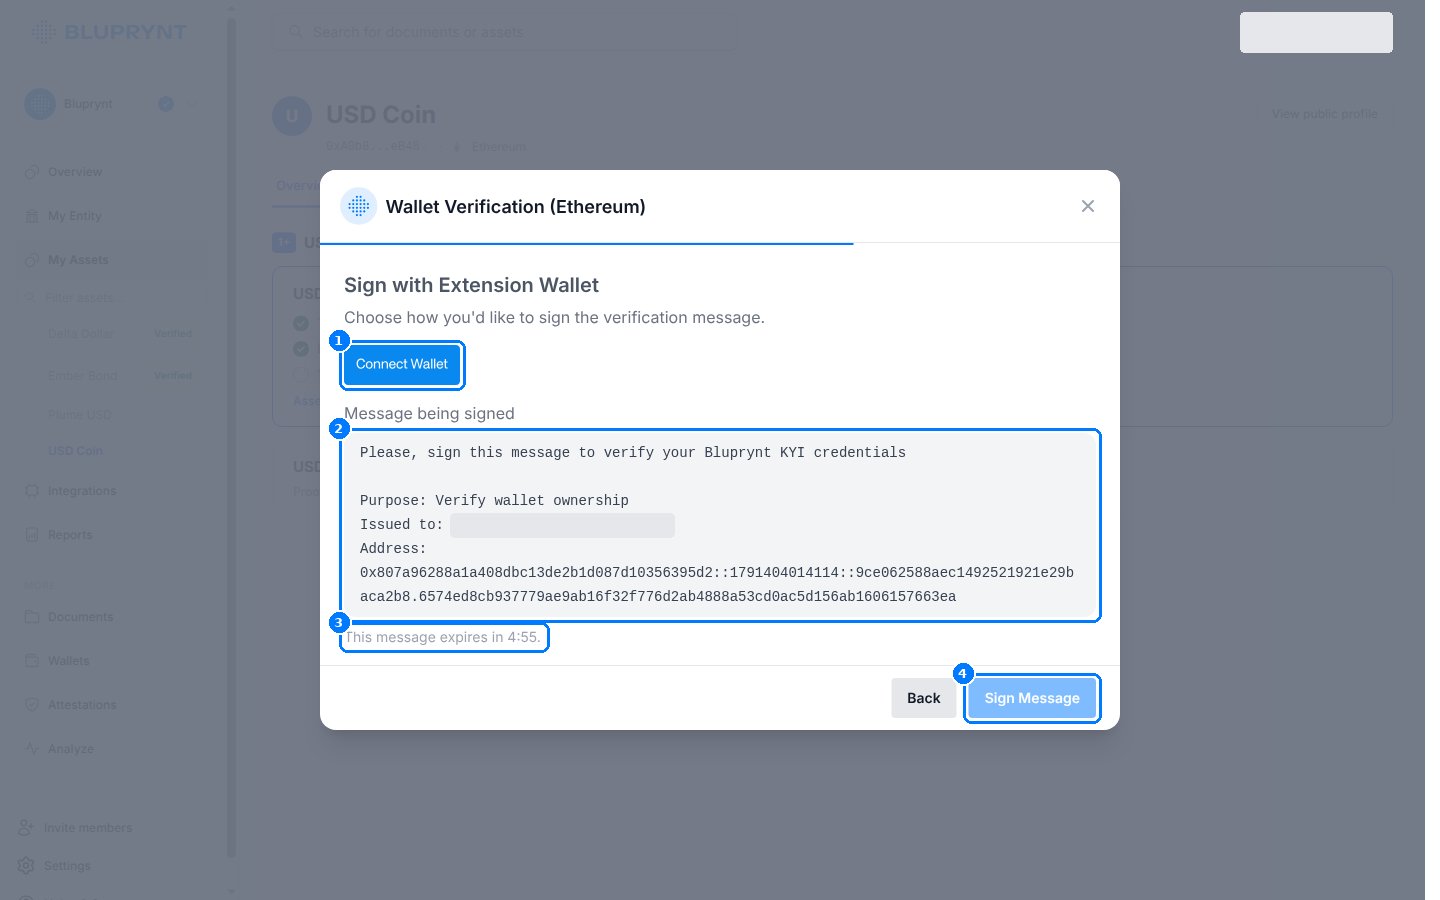
- Connect Wallet connects a browser extension wallet such as MetaMask or Phantom. Where WalletConnect is enabled for your integration, it opens the WalletConnect picker instead, for mobile wallets.
- Message being signed. It contains a purpose line, the organization it’s issued to, and the address with a one-time nonce.
- Expiry. The message is valid for five minutes.
- Sign Message asks the wallet for a
personal_signsignature.
The asset-list scope
kyi('drawer', 'asset-list', token) opens the organization’s assets.
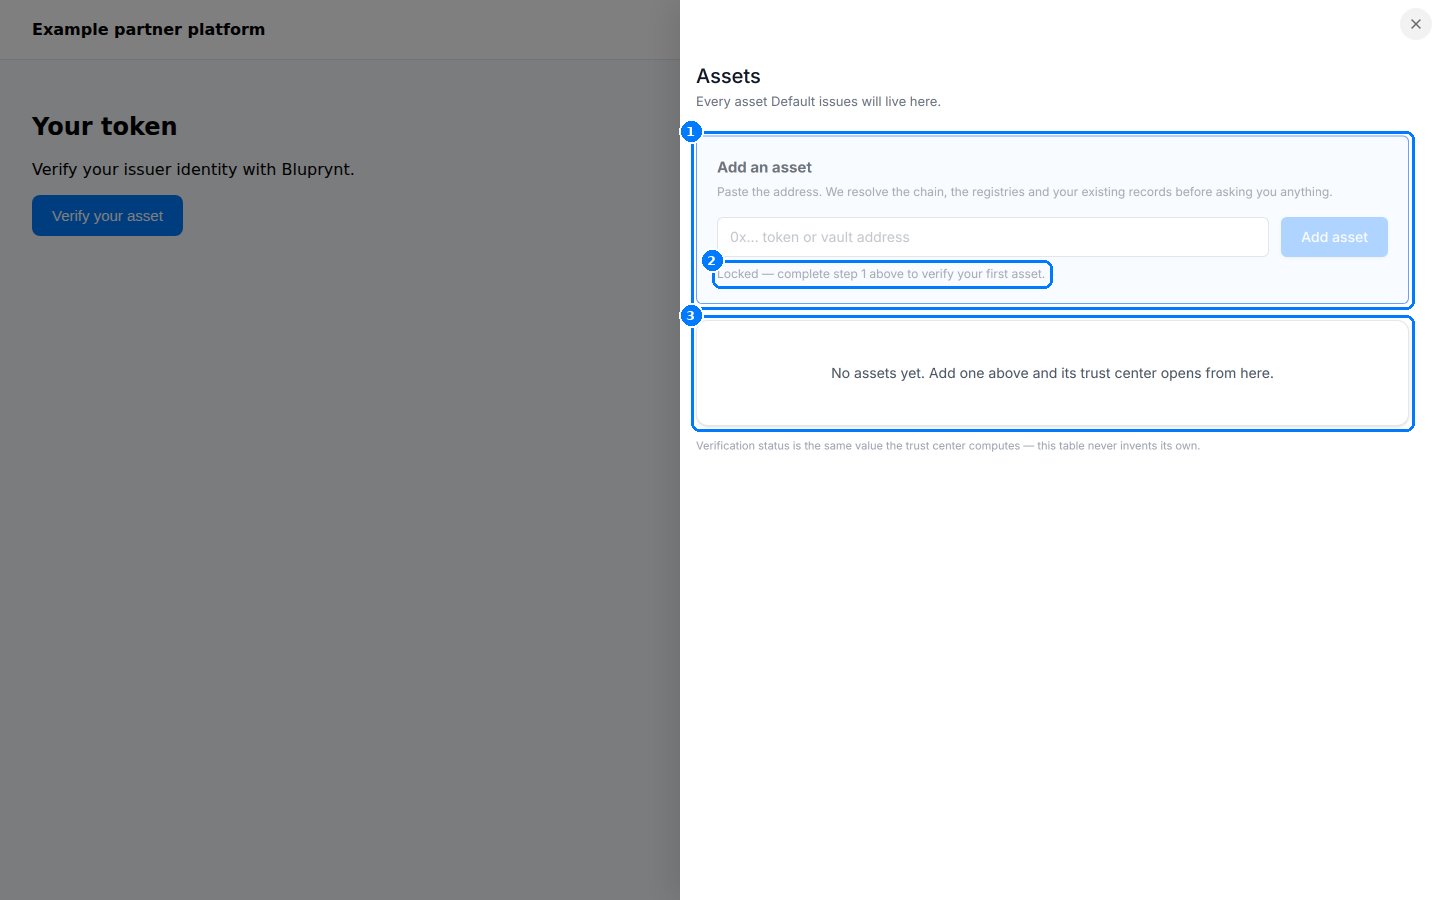
asset-list for an organization that hasn't finished KYB.
- Add an asset. The same address field as in step 3.
- Locked until KYB is done.
- Asset list. Each asset shows its chain, address, KYI status and Proof of Collateral status, and opens its trust center. The status is the same value the public trust center computes.
The wallet-list scope
kyi('drawer', 'wallet-list', token) opens the organization’s wallets.
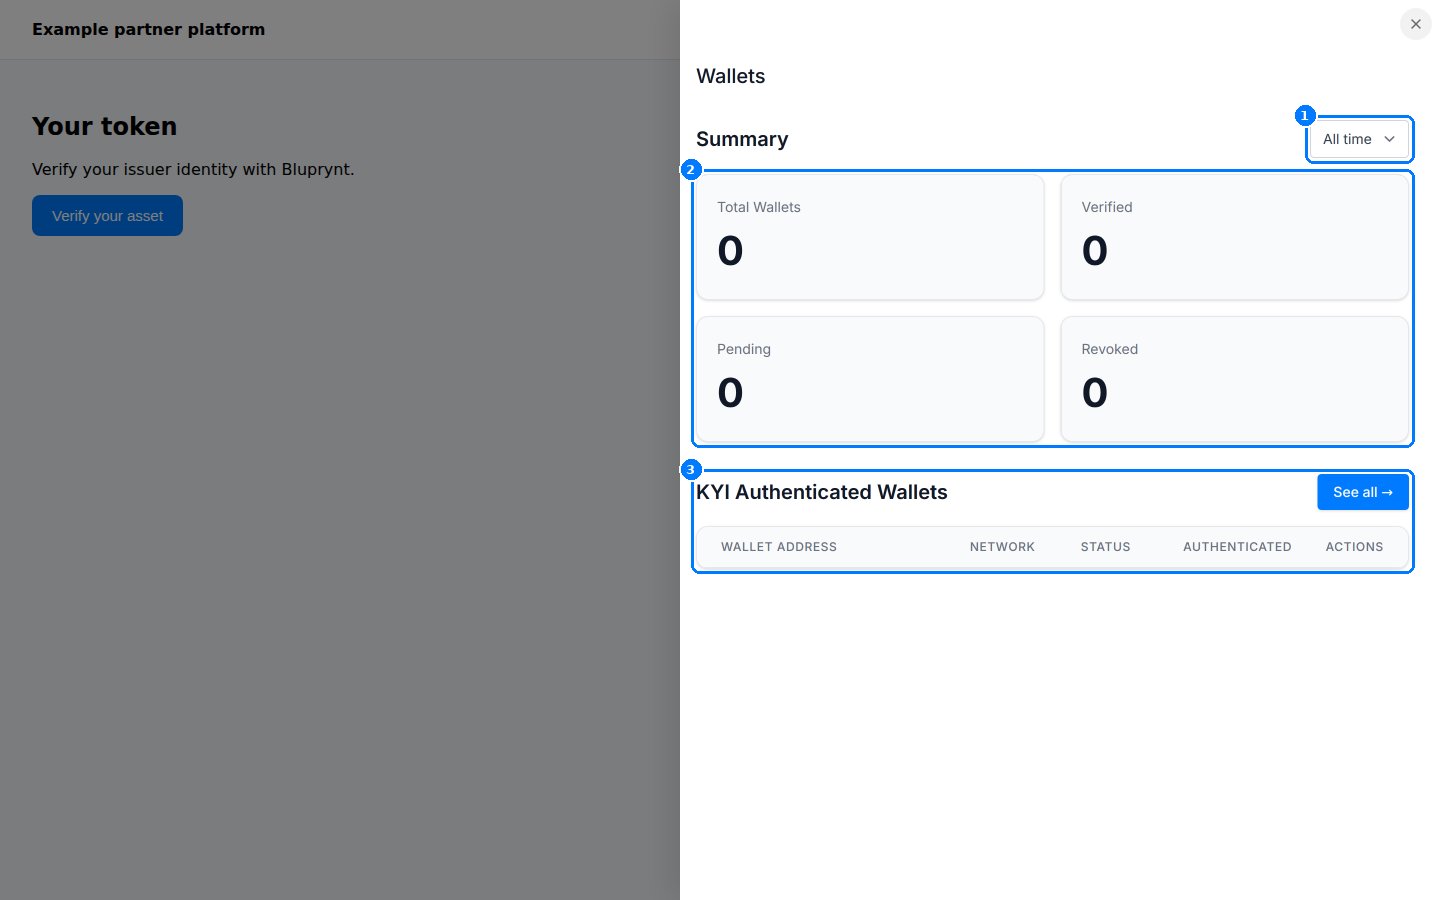
wallet-list for a new organization.
- Period. Filter the summary by time; the default is All time.
- Counters: total, verified, pending and revoked wallets.
- KYI Authenticated Wallets: address, network, status, authentication date and actions.
On phones
On narrow screens the drawer takes the full width, and the steps stack.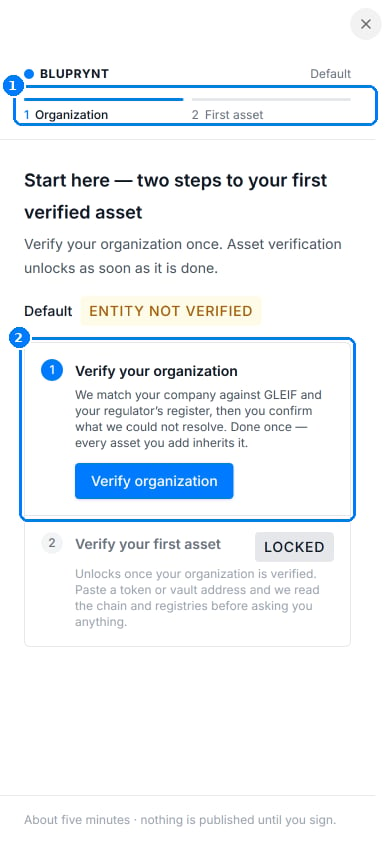
The kyi scope at 390 px.
- Progress bar.
- Steps. The same steps as on desktop.